Wednesday, October 11, 2023

SAP Kernel Upgrade: Step-by-Step Guide


Introduction:       

            In the realm of SAP systems, staying up-to-date is paramount. The SAP Kernel, often referred to as the heart of an SAP system, is a core component that requires periodic upgrading to ensure performance, security, and compatibility. In this blog, we'll embark on a journey through the process of SAP Kernel upgrade, understanding its significance, and learning the best practices to ensure a smooth transition.


Understanding the SAP Kernel:


             The SAP Kernel is a fundamental part of the SAP system architecture. It includes executable files, libraries, and programs that form the runtime environment for SAP applications. The Kernel interacts directly with the operating system and hardware, making it a critical component for system stability and performance.


Why Upgrade the SAP Kernel?


1.    Performance Optimization: Newer Kernel versions often include optimizations and enhancements that can significantly improve the performance of your SAP system.

2.    Security Updates: Security threats evolve continuously. Kernel upgrades often include security patches to protect your SAP system from vulnerabilities.

3.    Compatibility: To ensure that your SAP system remains compatible with the latest operating system versions and database platforms, Kernel upgrades are necessary.

4.    Bug Fixes: Kernel upgrades may include fixes for known issues and bugs, contributing to system stability.


The SAP Kernel Upgrade step-by-step Process:


Upgrading the SAP Kernel is a well-defined process, but it requires careful planning and execution. Here are the key steps involved:


1. Check the Current version of Kernel:


 Use the SM51 t-code click on Release Notes and check it.


Or click on System>ststus>Other Kernel info


2. Check PAM:


                     PAM is a Product Availability Matrix please go to the PAM portal use the S-user ID and Password and check which upgrade kernel version will support it.


Link for PAM portal: pam link


3. Stop SAP Server:


Login into OS level and stop the server in sapmmc.


4. Backup:


Take a Kernel Backup.

Go to the Kernel path usr\sap\SID\SYS\exe\uc\NTAMD64 Copy all files and Create one folder in any other drive and Paste it.


5. Download the New Kernel Files:


Download the Kernel SAPEXE, SAPDBEXE and SAPCAR files From the SAP Service Marketplace or SAP Software Download Centre.


Link: sap support portal


In the SAP Support portal click on Software Downloads select SUPPORT PACKAGES & PATCHES AND CLICK ON By Alphabetical Index (A-Z) Select K in that Download SAP Kernel files.
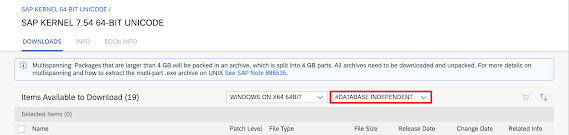


6. Extract the Kernel File:


   Create a New folder and store all these SAR files there. Then use SAPCAR to extract these SAR files.


Open Command Prompt go to the file path use the below command and extract the files.


Command: SAPCAR -xvf *.SAR


                                                                   ( xvf - extract –verbose –file )


7. Copy and Paste it into the Kernel path:


Copy all Extracted files and Paste them into the Kernel path it will ask for a skip or replace click on replace.


8. Start SAP Server:


Start the SAP Server it will take 4-5 minutes, Log into the SAP system and check the Kernel version.


Conclusion:

                       SAP Kernel upgrades are a critical part of maintaining a healthy and secure SAP landscape. By following best practices, meticulous planning, and thorough testing, you can ensure a successful Kernel upgrade that keeps your SAP system performing optimally and safeguarded against security threats. Keep your SAP system's heart healthy, and it will continue to support your business processes with excellence.


Tuesday, October 10, 2023

A Guide to Creating Directories in SAP Using Transaction Code AL11


Introduction:
                 In the complex landscape of SAP, efficient data management is paramount. SAP provides a handy tool to organize and manage file directories - Transaction Code AL11. In this blog, we'll explore how to create directories in AL11, why it's important, and the steps involved.

Understanding AL11

                 Transaction Code AL11 is a tool in SAP that allows you to manage directories and files in the underlying application server's file system. It's a powerful feature that facilitates data management and ensures that your SAP system is organized and efficient.

Why Creating Directories in AL11 is Important

1. File Storage: AL11 directories are used to store various types of files within the SAP application server. This includes application-specific files, logs, and data files.
2. Data Archiving: When you're dealing with data archiving or data extraction processes, having well-structured directories simplifies the process. Archived data can be stored neatly in specific folders.
3. Log Files: Log files generated by various SAP processes and applications are stored in AL11 directories. These logs are crucial for troubleshooting and auditing.

Creating Directories in AL11 - Step by Step

Here's a step-by-step guide to creating directories in AL11:

Step 1: Create a folder at the OS level
Login to the OS level Create a folder and Copy the Path of the Folder.

Step 2: Access Transaction Code AL11
Log in to your SAP system using the appropriate credentials.
Open the SAP GUI interface.
Enter AL11 in the command field and press Enter. This will open the AL11 directory structure.

Step 3: Click on the Configure user directories icon 
Click on the Configure user Directories icon.


Step 4: Create a New Directory


A dialog box will appear. Please enter. the Name of Directory Parameter and Directory Name and Valid for Server Name. an example is shown below.


Step 5: Save 
Click the 'Save' button.


SAP will display a confirmation message, indicating that the Entry Saved.

Step 6: Verify the New Directory
You should now see the newly created directory listed under the parent directory in the AL11 directory structure.


Step 7: Additional Settings (Optional)
Depending on your specific requirements, you can configure additional settings for the directory, such as permissions, authorizations, and retention policies.


Conclusion

                  Creating directories in SAP using Transaction Code AL11 is a straightforward process, yet it plays a crucial role in maintaining an organized and efficient SAP system. Well-structured directories simplify data management, archiving, and troubleshooting processes. By following the steps outlined in this guide, you can easily create directories in AL11 and ensure that your SAP system remains well-organized and optimized.


Saturday, September 23, 2023

Step-by-Step Guide: Installation of SAP GUI in Windows


Introduction:

              SAP GUI (Graphical User Interface) is a crucial tool that enables users to interact with various SAP applications. It provides an intuitive and user-friendly interface to access and work with SAP systems. In this step-by-step guide, we will walk you through the process of installing SAP GUI on your computer, ensuring you have a smooth and efficient SAP experience.

Step 1: Prerequisites

                 Before you start the installation process, ensure that your system meets the minimum requirements for SAP GUI installation. These typically include:
A compatible operating system (e.g., Windows, macOS, Linux)
Sufficient disk space
Network connectivity to the SAP system
Necessary user permissions

Step 2: Download SAP GUI

Download SAP GUI from the Below Link.
Download Link:  DOWNLOAD


Step 3: Follow the below Steps to install SAP GUI

1) Open the file and go to this path 
SAP-GUI-8.0-WINDOWS\SAP_GUI_for_Windows_8.00_Comp._1_\PRES1\GUI\Windows
2) Select win64 / win32 depending on your system.
3) Click on SapGui64Setup

4) Click on Next

5) Tick the first 3 options and click on Next


6) click on Next


7) The installation will start, wait until it is complete to 100%


8) Click on Close 


Congratulations! You have successfully installed SAP GUI and configured your first SAP system connection. You can now seamlessly access various SAP applications and perform your tasks efficiently.

Conclusion:

Installing SAP GUI is a straightforward process that allows you to connect to SAP systems effortlessly. Whether you're a business user, developer, or administrator, having SAP GUI installed on your computer is essential for interacting with SAP applications and managing critical business processes. Follow the steps outlined in this guide to set up SAP GUI and enjoy a smooth and productive SAP experience.


Mastering Hosts Entries: Adding Hosts Entries on macOS


Introduction: 
                         Have you ever wondered how your computer translates domain names like "google.com" into IP addresses? The answer lies in a simple but powerful file called the "hosts file." In this blog, we'll explore what hosts entries are, how they work, and how you can leverage them to your advantage and we'll walk you through the process of adding hosts entries on macOS, enabling you to take control of your online experience.

What are Hosts Entries? 
                         A hosts entry is a record in the hosts file of your computer's operating system. This file contains mappings of domain names to IP addresses, allowing your computer to resolve domain names without relying on external DNS servers. Think of it as your computer's personal address book for the internet.


Why Use Hosts Entries?
1.Local Testing and Development:  Developers often use hosts entries to associate domain names with local IP addresses. This enables them to test websites or applications locally before deploying them to the live environment.
2.Blocking Unwanted Content:  By mapping ad-serving or malicious domains to non-functional local addresses, you can effectively block unwanted content, ads, or potential security threats.
3.Redirecting Websites:  You can redirect certain domain names to other URLs. For instance, redirecting "example.com" to "localhost" can be useful for setting up custom landing pages.
4.Network Isolation:  Hosts entries can be used to isolate specific servers or resources, redirecting them to internal or virtual environments.


How Hosts Entries Work:  When you enter a domain name in your browser, your computer first checks its hosts file. If there's a corresponding entry, the associated IP address is used for the connection. If not, the computer queries DNS servers to find the IP address.

Creating Hosts Entries: Creating a hosts entry involves editing the hosts file. 
Here's a basic example:

127.0.0.1 localhost  
192.168.1.10 mywebsite.com 


The first line maps the loopback address (localhost) to the IP address 127.0.0.1, which is your own computer.
The second line maps the IP address 192.168.1.10 to the domain name "mywebsite.com."


Follow these steps to add hosts entries on your macOS system:

1. Open Terminal: Launch the Terminal application. You can find it in the "Applications" folder under the "Utilities" subfolder. 


2. Enter the following command and provide your admin password.

command: sudo nano /etc/hosts

3. Enter your admin password And click on enter


4. Navigate and Edit: The Terminal will open the hosts file in the nano text editor. Use the arrow keys to navigate to the end of the file or to the desired location.


5. Add Entries: To add a hosts entry, type the IP address followed by the domain name. 
For example:

                                    123.456.7.89     MYSERVER      MYSERVER.mydomain.com


6. Save Changes: After adding entries, press "Control" + "O" to save the changes, then press "Enter." To exit nano, press "Control" + "X."


Flush DNS Cache: To ensure your macOS recognizes the new entries, if your changes aren’t going live, the problem may be with your DNS cache. Therefore, Flush DNS Cache using this command in Terminal.
Command: sudo dscacheutil -flushcache 

Tips for Successful Entry
1. Be Precise: Ensure your entries are accurate. Mistakes can lead to connectivity issues.
2. Backup Hosts File: Make a backup of the hosts file before editing. In case of errors, you can restore the original.
3. Use Comment Lines: You can use a "#" at the beginning of a line to add comments describing the purpose of each entry

Conclusion: 
                 Adding hosts entries on macOS empowers you to customize your internet experience, from local development to personalized redirection. By understanding the process and following these steps, you can master the art of modifying your hosts file and enjoy a more tailored online journey. Just remember, while it's a powerful tool, make sure you use it thoughtfully and responsibly